Thursday 2 May 2013

how to bye a domain name from godaddy cheap indian price


Hi Friend If You Want to Bye Cheap Domain name from godaddy
then click on this link http://www.godaddy.com/deals/?isc=wowlp
or use this referral code: WOW0301
you save 35% money
injoy this trick or thanks for read it

Monday 1 April 2013

HOW TO FLASH S60V5 MOBILE WITH CUSTOM FIRMWARE – DETAILED TUTORIAL


S60V5 Flashing

Some days Ago We Start A Tutorials About Custom Firmware Flashing In Nokia Mobiles.Today I Going To Teach You How To Flash Your Mobile To Custom Firmware Using JAF.
I Explain Whole Tutorial In Deep, So Read Carefully And You Will Be Success Fully Flash Your Mobile To Custom Firmware.Where I Get Custom Firmware And Where To Extract It?We Will Upload Custom Firmwares Frequently To Help All Phones .If You Not Found Custom Firmware of Your Mobile Please Be Patient We Uploaded As Soon As Possible.
We Will Put Links Custom Firmware On Below This Article OR You Can Find It On Our Homepage.
After Download CFW(Custom Firmware) For Your Mobile From Here, You See A Folder Under It Called RM-XXX . Extract It To C: \ Program Files \ Nokia \ Phoenix \ Products \
So, It Will Look Like This For RM-428,
C: \ Program Files \ Nokia \ Phoenix \ Products \ RM-428
IF The Directory Not Exist Than Make a New With Name RM-XXX.Now Going To Tutorial About JAF :-
=> What Is JAF?
JAF is A Software For Flashing Mobile Phones And Its Very Easy For Flash Mobile To Custom Firmware Using JAF.
=> How To Install JAF?
First Download JAF Software From Here……. Download JAF
The JAF is a complex software and uses a hardware device actually to flash Nokia Phones known as Pkey dongle. We dont have it, so we use the pkey emulator to fool JAF thinking that we have the Hardware. It will be tagged as virus by most antivirus, but ignore it, its safe.
Unrar the files and install JAF to the default directory in program files. DO NOT CHANGE THE DIRECTORY or the pkey emulator will not work and you will have to reinstall. Do not run anything. 
Copy the pkey file to \Program Files\ODEON\JAF and create a shortcut for the pkey file on desktopAfter deleting all other JAF shortcuts on the desktop. The location can be “Program files(x86)” for a 64-bit OS.
Run the pkey emulator link shortcut on the desktop. A windows with lots of emulation types open up, forget it all and press RUN. A red JAF splash screen will pop up followed by an error “ERROR:BOX DRIVER NOT INSTALLED”, click OK and JAF will open up.
Now, You will see 3 tabs, DCT4, BB5 and P-key. Our phone is BB5 type, so click on it.
There will be lots of check boxes, enable ‘Normal Mode’ and disable ‘CRT 308′.
Now enable ‘Manual Flash’ and ‘Dead USB’.
Finally after the above two steps, enable ‘Use INI’ and wait for 10 seconds to allow the phone selection box to open. Look at The Image Below…….
Click To Zoom

A ‘Select Phone Model’ box will open and look in the second column for Nokia 5800D-1 and make sure left is RM-356/RM-428 depending on your type and click ok. It Depend On Your Phone Model And Firmware.Check It Via Dialing *#0000# From Your Mobile.
After Selecting Your Phone’s Details You Will Show JAF Window Like Below,
Click To Zoom

In the Box PHONE MODE  select NORMAL.
Make sure that your phone has enough charge and will not switch off in the next 15mts. Switch the phone off, connect USB cable to pc and phone and leave it. After switching off, insert your memory card.
Now everything is done, click on the ‘FLASH’ button the top right corner of JAF window. A warning box will pop up, dont get scared, its just a general notification, so click ‘YES’.
Now it will tell “PRESS POWER ON NOW! Searching for phone…”
Now press the phone’s power button for 1 or 2 seconds to switch it on, don’t keep holding it. You will not get a vibration as usual and the screen will go white. Check on JAF now and it will say phone found and erasing and flashing will start shortly.
Flashing takes 1 minute and then JAF will say Done after pooling the fone. The phone will restart and PC will get 3 beep sounds.
You can now Remove usb cable and use your phone!!
View The Complete Tutorial In Video Below :
WARNING AND NOTES :-
* DO NOT ADD OR DELETE ANY FILES FROM THE FIRMWARE FOLDER U HAVE DOWNLOADED UNDER ANY CIRCUMSTANCES.
* Don’t EVER USE FOTA to update your phone or it will be DEAD! If in any case you want to update, you need to flash with original phone version before using FOTA
* ONCE YOU CLICK FLASH, DO NOT PULL THE USB CABLE, NOR LET POWER TO PC FAIL OR LET PHONE BATTERY RUN DOWN, YOU WILL BRICK YOUR PHONE!
If You Face Any Problem Or Get An Error Than Kindly Comment Here.I Will Surely Help You.
Custom Firmware For Nokia 5800 And Others Are Posted at HERE
Keep Updated And Share This Post With Friends To Help Us.

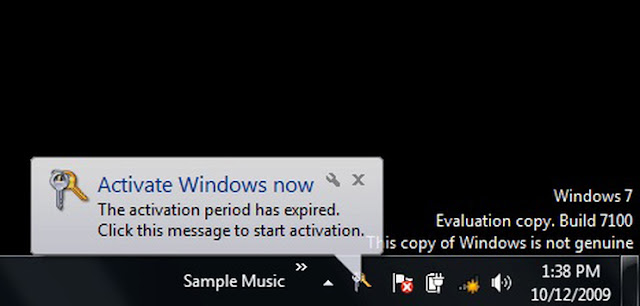
HOW TO REMOVE WINDOWS 7 GENUINE NOTIFICATIONS COMPLETELY?

Windows 7_Featured

Windows 7 Genuine Notification


Hello Guys Today I Came With Some Amazing Stuff To Remove Very Annoying Notifications Of Windows Genuine On Windows 7.
Many Guys Suffering From This Problem Now A Days And There Is No Other Solutions To Remove This Type Of Notifications.
If You Don’t Buy A Genuine Windows 7 Version Than It Has Happened To You. And It Is So Annoying.
So, Today I Give You The Software With Tutorial To Help You Remove This Type Of Notifications Completely From Your Windows 7.
So Follow The Procedure Here…
First Of all Download The RemoveWat Software From The Below Link.
=> RemoveWat Is A Software That Help Us To Remove Windows 7 Genuine Notifications Completely From It. Here I Packed Latest Version Of RemoveWat 2.2.5.
After Download The Package, Extract It To Your Pc And Open RemoveWat.exe.
Note That It Is Recommended To Close All Programs Before Open It.
UPDATE If Your Antivirus Prompt You The File As Virus, Then Don’t Worry, It Only Show Because Windows Don’t Like It Because It Removes Windows Genuine Notifications. It’s Not A Virus So Enjoy Using It.
After Open It Click On RemoveWat And Wait For 2 Minutes And After It’s Done, Your Pc Will Be Restart.

After Restart Your Windows Pc, You Can See That All Notifications Of Windows Genuine Will Be Removed And You Have A Completely Genuine Windows 7.

MAKE YOUR WINDOWS PC LOOKS LIKE MAC


Mac In Windows

Download Links Updated. You Can Download Now.!!
Everybody Knows About Mac OS. And Also Want To Use It. So Here Is A Tutorial How To Make Your Windows Xp/7/Vista Look Like Mac Without Any Risk.
It Not Change Full Operating System To Mac, This Is Only Theme And Some Effects That Very Similar To Mac. So Don’t Hesitate To Try It. You Can Get Back To Windows Anytime.

Now Follow The All Steps Carefully And See What Happen !
Step 1. Download This File – All Files That We Need Are In The File.
=> Now Extract The Files To Anywhere In Your Pc.

Step 2 : Open Rocketdock Folder And Install RocketDock-v1.3.5.exe.
After Install Rocketdock Do The Following : 
  1. Copy The Folder Stardocklet To C:\Program Files\RocketDock\Docklets
  2. Copy The Folder Nabs osx leopard To C:\Program Files\RocketDock\Skins
  3. After Copy It To Skin Folder, Open Nabs osx leopard Folder And Copy indicator.png To C:\Program Files\RocketDock\Defaults\DefaultIndicator
Step 3 : Open Replacer.zip From Apps Folder And Extract It To Desktop (Or Anywhere Else). - Little Difficult Part For Newbies !
  • Now Open Replacer.cmd And Go To C:\Windows\system32 And Find uxtheme.dll
  • Drag The uxtheme.dll File From C:\Windows\system32 To Replacer.cmd And PressEnter.
  • Now immediately Go To Apps Folder ( In Extracted Files) And Find uxtheme.dll
  • Drag This uxtheme.dll To Replacer.cmd Again And Press Enter.
  • When Replacer.cmd Ask Y Or N Press Y And Press Enter. It’s Done.
Now The Difficult Part Is Over.
Step 4 : Theme Installation – Its Very Easy !
  • Now Open Mac Theme For Windows Folder From Extracted Files.
  • Copy Leopard X.theme And X Folder To C:\WINDOWS\Resources\Themes.
  • Double Click On Leopard X.theme And Click Apply And Then Ok.
Now Your PC Is Changing To Mac But We Need Some Customization To Get It Completely Look Like Mac.
=> Now Go To Desktop And Right Click On Any Empty Space And Go To Arrange Icons By AndUncheck Show Desktop Icons.
If You Not Understand It Click Here To See Image : Uncheck Show Desktop Icons Image
=> Right Click on Taskbar and untick Lock Taskbar and Pull Taskbar to Top of the Screen and Again Right Click on Taskbar and tick Lock Taskbar.
If You Not Understand It Click Here To See Image : Change Taskbar Position Image
=> Now Open Rocketdock, Right Click On It And Set Screen Position To Bottom.
=> Now Right Click On Rocketdock Again And Click On Ad
d Item And Select Stack Doclet And Open It And Change Settings As You Like.
If You Not Understand It Click Here To See Image : Add Item Rocketdock Image
Now You Can Add More Effects By Installing Apps That Provide With Downloaded File In Folder Called ‘Apps’
If You Want More Customizations Than Contact Me Via Contact Form.
Its All.If You Had Any Problem Installing Or Customizing It Please Put Your Comments Below And Share This With Friends To Help Us.

=> UPDATE 

Many Readers Ask About How to Make Exact Windows Buttons (Back,Forward Buttons)Like Above Image.
So Today I’m Going To Give Short Tutorial About It.


Follow This Steps :

1. Download The File The Below File
2.Now, Install Styler1401.msi To Your Computer.
3.Now Just Drag and Drop the “Mac Styler” Folder into “Program Files\Styler\TB\skins\Styler’s”

Now Open Installed Program Styler And Go To Toolbar Tab From it.
And Click On Styler’s. You Will See Mac Style Option.Click On It.

WINRAR 4.20 ( X86/X64 ) FULL VERSION FREE DOWNLOAD


WinRAR is a lightweight, flexible, and easy-to-use archiving utility that can unpack most archive formats, as well as compress to both RAR and ZIP.WinRAR is a top dog in the compression category.
WinRAR’s interface is about as simple as it gets. Start creating (or add to) an archive by dragging and dropping your files into the interface or by browsing through the Folder Tree side panel (when enabled). From there, the most common functions are laid out in the form of colorful, mostly intuitive icons along the top, which can all be customized by downloading themes from the company’s Web site. You can Add files to, Extract, Test, Delete, or even Repair archives right from the main interface. Drop-down menus house the program’s more advanced features, including self-extracting archives, archive locking, benchmarking, and autodeletion of temp files.
Download Winrar For Your Operating System From Below Links :
Install Instructions :
  • Download Winrar from above link depend on your operating system.
  • Install it by double clicking on downloaded file.
  • That’s all, You’ve installed full version of Winrar.
Note : If you have previously installed Winrar, Then uninstall it, Reboot Pc and then Install it from Downloaded file.
Please write down your reactions on Comment box below.

CERTIFICATE ERROR SOLUTION FOR SYMBIAN MOBILES PHONES


Getting “Certificate Error Contact the Application Supplier” everytime trying to install softwares and games on symbian smartphones? Than this article is only for you. In this post i will show you easy method to hack your smartphone and install any games or software to your phone. You don’t need pc to do it, You can do it within your mobile.
So, Here’s step by step guide :
Step 1
First of all you have to download 3 apps to start the process. I uploaded it individual so, you don’t need any zip extractor or anything else.
Download 3 apps below one by one to your phone :
Step 2
Now you have downloaded the 3 apps above, so you need to install “Norton Symbian Hack” to your phone and follow the procedure.
After you installed first app from above list, Launch the application and Go to Options -> Antivirus ->Quarantine list. And you’ll see some files listed there. Then Go To Options -> Restore All. You will ask to confirmation, Click Yes.
See the images below for easy understanding on this step. Click to Zoom
Now, after you restored all Quarantine items,Exit the app and Go to Settings -> App Manager -> Installed apps. And Uninstall Application named “Symantec Symbian Hack“.
Step 3
Now, Install the second application provided above named Rom Patcher. Then Launch the application and you’ll see 2 items listed there.
Now go to Options -> All Patches -> Apply And ThenOptions -> Add to Auto For Both.
Note : If you’re getting error like Red icon on rompatcher Then Download this file “InstallServers” and read the read-me file and find the appropriate file for your phone and copy the file Installserver.exe to C:/sys/bin. – Only if you getting errors on RomPatcher.
Step 4
Now we need to delete folder C:/Shared from phone, But the default file manager doesn’t allow us to delete it. So we need another file manager called Y-Browser to delete it. It’s provided in download link above on 1st step. After download install it and Launch Y-Browser and delete the folder C:/Shared from it.
After done all this steps, Restart your mobile, Just for refresh it.
That’s All. You can install any application or games to your phone now without any error.
Enjoy And Please Show Your Results In Comments.